Thursday, March 31, 2011

Mac and Cheese: A Recipe For a Cold and Rainy Spring Day; Artificial Food Dye Need Not Apply When You Make It From Scratch!


Yesterday, there was an alarming news story linking food dye and hyperactivity in young children. I'm not surprised about the existence of the dye but a lot of the foods they're in are marketed to and staples of a child's diet and warrants a second look if your tyke is a bit of a handful.
Aye mateys, there's food dye in the 'crunch!!'

Food dyes are in Mac and Cheese, Jell-o, Minute Maid Lemonade and many cereals (think Fruit Loops, Apple Jacks, Cap'n Crunch!). For many years the FDA believed that the dyes or artificial food coloring would not worsen behavior problems like hyperactivity in some children but as of yesterday, they're taking a second look. If the FDA changes their position we may start to see warning labels on boxes of food products that contain artificial food coloring.

I had an untested recipe for Mac and Cheese and thought that since winter was gone I'd save it until after the summer. I think of Mac and Cheese being the ultimate comfort food especially in cold temps, but we have unseasonably cold weather and the fact that the boxed version of the macaroni dish was in the news, I dug out my recipe to make a 'dye-free' casserole.

The recipe follows. It's easy to make, not particularly low in calories, but I used fat free milk at least and skim versions of the two cheeses. Everything helps! I added a toasted bread crumb topping to mine because I remember my mother making it that way. If not eating right away, add a bit of milk when reheating to counter the dryness of the casserole after it sits for a while.

Homemade Mac & Cheese
Ingredients
1 1/2 tablespoons unsalted butter, cut into small pieces, plus more for baking dish
3 cups milk
4-5 grape tomatoes diced
1 teaspoon coarse salt, plus more for water
1/2 teaspoon freshly ground pepper
1/4 teaspoon cayenne pepper, or to taste
3 cups grated white cheddar cheese
1 cup grated Swiss cheese
1 pound elbow macaroni
1 cup bread crumbs mixed with 1/2 cup of light olive oil

Directions
  • Preheat oven to 375 degrees. Butter a 2 1/2-quart casserole dish.
  • Warm milk and tomato paste in saucepan over medium-low heat. Add salt, pepper, cayenne pepper, cheddar cheese, and Swiss cheese; set cheese sauce aside. Whisk until smooth.
  • Bring salted water to a boil. Cook until pasta is al dente. Drain well then stir macaroni into reserved cheese sauce. 
  • Toast bread crumbs in fry pan with olive oil until slightly browned.
  • Pour mixture into prepared dish. Top with toasted bread crumbs and dot with butter. Bake for 45 minutes or until golden brown and bubbling.

Wednesday, March 30, 2011

Meringue Cookies: Tiny Fat-Free Pillows That Melt In Your Mouth; Using Leftover Ingredients Can Be Sweet


I honestly thought I was finished with my Easter baking 'test-kitchen' but I found I had six egg whites left over from yesterday's cookies that I just couldn't bring myself to throw out. Meringue cookies immediately came to mind. I'd made these several years ago and didn't save the recipe but the ingredients are remarkably minimal and the whole process of preparing the cookies is quite easy.

Meringue cookies melt in your mouth. With a crisp outer shell, the insides are a bit like a toasted marshmallow and they kind of just disappear as quickly as they are ingested. As I gazed at the meringues while they were were baking in the oven, I thought they would make a fun topping for an ice cream sundae and I'm pretty sure I saw them being used in a parfait on Rachel Ray a couple of months ago. But by themselves or mixed with cake or ice cream, these pretty confections make a positive impression on a dessert buffet. Did I mention they are fat free!!

My amoeba-shaped first try!
The recipe I used called for superfine sugar and you can accomplish this by putting regular sugar in the food processor for a half minute or so. The meringues are baked in a low and slow oven which promotes a gradual evaporation of the moisture from the meringues. Rain and humidity affect the cookies as well and you'll have to bake them for a longer time if those are the conditions.

I made three different colors, adding food coloring as I completed a batch. I made a white set first and added almonds and chocolate sprinkles to their tops. The meringues can be spooned onto parchment paper or piped out through a pastry bag. I decided to use the bag, though I'm very inexperienced at it, and some of the meringues are quite 'interesting' looking. I got better as I went along and I think the pink batch came out the best.

This cookie does have a sort of history, European in origin but dubious about the country where they were first invented. This is from Wikipedia:
The notion that meringue was invented in the Swiss town of Meiringen by an Italian chef named Gasparini is contested. It is more probable that the name meringue for this confection first appeared in print in François Massialot's cookbook of 1692.  The word meringue first appeared in English in 1706 in an English translation of Massialot's book. Two considerably earlier seventeenth-century English manuscript books of recipes give instructions for confections that are recognizable as meringue, though called "white biskit bread" in the book of recipes started in 1604 by Lady Elinor Fettiplace (c. 1570 - c. 1647) of Appleton in Berkshire (now in Oxfordshire),[4] or called "pets" in the manuscript of collected recipes written by Lady Rachel Fane (1612/13 - 1680), of Knole, Kent. 
Meringue Cookies
Ingredients: 
6 large egg whites 
1/2 teaspoon cream of tartar
1 and a half cups of superfine or caster sugar (if you don't have superfine sugar take granulated white sugar and process it for about 30 seconds in a food processor)
1/4 teaspoon pure vanilla extract
Garnish: (optional):
I used sliced almonds and chocolate sprinkles but I could see mini M&Ms on top or mini- chocolate chips. I saw a recipe that called for pecans mixed in the meringue, probably with a delicious result!

Directions: 
  • Preheat oven to 200 degrees. Line a baking sheet with parchment paper. 
  • Form the cookies with a pastry bag fitted with a 1/2 inch plain tip or use a spoon to make the cookies. 
  • In the bowl of your electric mixer beat the egg whites on low-medium speed until foamy. Add cream of tartar and continue to beat the whites until they hold soft peaks. Add the sugar, a little at a time, and continue to beat until the meringue holds very stiff peaks. Beat in the vanilla extract
  • Note: Meringue is done when it holds stiff peaks. If the mixture feels gritty the sugar has not fully dissolved. Keep beating until it feels smooth. Divide and add food coloring if desired.
  • Transfer the meringue to a pastry bag fitted with a 1/2 inch tip. Add optional toppings. 
  • Bake the meringues for approximately 1 1/2 to 1 3/4 hours, rotating the baking sheet to ensure even baking. The meringues are done when they are pale in color and fairly crisp. Turn off the oven and leave the meringues in the oven to finish drying overnight.
  • Makes about 30 mini-meringues

I couldn't find the Rachel Ray Meringue Parfait but this looks delicious as well:

Tuesday, March 29, 2011

Ciao Bella: The Delights of Delectable Venice; "Mi Scusi Cameriere, There's a Cookie in My Cappuccino!"


One of my favorite places is Venice, Italy. Over the years I've heard some acquaintances complain about the 'city of bridges:' "It smells bad in the summer," "There's sewage and garbage floating in the canals,"  "There are no cars, you have to walk everywhere." I can honestly say I've never had any of these experiences except for walking everywhere though that might be the thing I like the most!
My husband, myself and some friends have been there three times and each time seems more magical than the last. The food, the music, the Churches, the canals are stuff of dreams and I think about returning to the city often.

The undisputed center of Venice is the Piazza San Marco. There, in the shadow of the great St. Marks and the Triumphal Quadriga (or Horses of St Mark's) set into the facade of the Basilica, are several grand cafes. In the evening, Venetians and tourists (ok, probably mostly tourists) flock to the indoor and outdoor tables to absorb the fabulous music, sip the coffee, and enjoy each other's company....and did I forget to mention, savor the pastries? I've included some websites of some of the most popular of the San Marco establishments for you to salivate over!


http://www.caffeflorian.com/ 

http://www.quadrivenice.com/pages/home.php?ling=EN
http://www.rosasalva.it/pages/it/chi-siamo.php?menu=aperto

Last week, I came across a recipe for Venetian Butter cookies in a July 2000 Martha Stewart Living magazine. Continuing my Easter cookie quest, these 'S' shaped treats seemed like an interesting candidate for a tryout especially if they created a sense of the Italian city. As I usually do, I looked to see if there was a historical significance to them but finding nothing I decided the purpose was just to enjoy the sweet scent that wafted through the house as they were baking, as I did. These cookies are made for dunking in your caffè latte..... It's not a suggestion but a command!

Venetian Butter Cookies
Makes about 3 dozen

Ingredients
10 tablespoons (1 1/4 sticks) unsalted butter at room temperature
1 1/4 cups sugar
1 teaspoon pure vanilla extract
1 teaspoon freshly grated lemon zest
1/2 teaspoon salt
6 large egg yolks
3 cups all-purpose flour

Directions
  • Preheat oven to 350 degrees. Line baking sheets with parchment paper. Set aside.
  • In the bowl of an electric mixer using the paddle attachment, combine butter and sugar. Beat on medium until light and fluffy. Add vanilla, lemon zest, and salt, combining. Add egg yolks, 1 at a time, beating well after each addition, Reduce speed to low, and add flour, 1 cup at a time, beating until fully combined.
  • Roll a walnut-size piece of dough into a ball, then roll out into a rope about 3 inches long and 1/4 inch in diameter. Shape into a decorative S. Transfer to prepared baking sheet. Repeat with remaining dough, placing cookies about 1 1/2 inches apart on baking sheet. Bake until firm, 12 to 15 minutes. Transfer to wire racks to cool. The cookies will keep in an airtight container for up to 2 weeks.

Note: My cookies were only slightly 'S shaped (see photo) but in think they should have formed a tighter letter. My batter was a bit dry and I might have added more softened butter to get a more moist consistency. No matter, they were delicious. These cookies are sweet but not overly, so when they were cooled, I sprinkled them with powdered sugar.

Monday, March 28, 2011

Handpainting Furniture: A How-To Project You Might Want To Try

I have a small part-time job painting names and illustrations on children's furniture for a local store. It's something I can do at home putting my drawing and painting skills to use, hopefully creating happy memories for the young recipients. Rocking horses, step stools or chests are some of the items that can be personalized.

Painting and lettering is a skill but one that can be learned with some patience, paint, a few tools and a computer printer. I'll list some steps below and supply a shopping list in case you want to give this a try.

Of course, doing these small items for others has revived my interest in hand painting a few things of my own. When my husband and I were first married we lived in a small apartment with very little furniture. Visiting my mother one day on Long Island, we took a ride to one of her favorite haunts: the local Salvation Army. Here she would pick through donated stuff with a discerning eye in hopes of finding a treasure to take home. This was not my husband's idea of a good time but I got into the spirit and discovered a tall double doored chest, really a wardrobe, that was painted white. The piece was chipped and worn but had a metal label at top indicating that it came from Wanamakers, a now defunct but respected department store. It was only $20. and I could envision it adding to our closet space in our storage-challenged apartment. The only problem was getting it home to to Queens (one of the boroughs of New York City) where we lived. We had a Volkswagen beetle.

Well, as my husbands luck would have it, the chest remained in my mothers basement for almost 25 years when in a fit of defiance, I insisted that it come home with us (now to Staten Island) and since we had three children, we of course owned a van. The chest fit nicely in the back with all of the seats removed. What we did with the kids is a bit foggy, but no matter, I finally had my chest.

I took it to a furniture stripper and had the paint removed. My intention was to paint it. Fast forward almost 10 years later, the chest remains unpainted.

It's a great piece (pictured at left) and we get lots of compliments on it. I've finally decided on a plan for the chest: Asian-style cherry branches and blooms complete with illustrations of birds of all species. I'm thinking of a light Tiffany blue background with brown and tan branches, white blooms and of course lots of beautiful plumage. Will share the 'masterpiece' when completed.

Here's a 'How To' in case you feel inspired to get involved in a similar project.


Supplies

Craft paints from stores like Michael's, AC Moore, of all colors or the sample wall paint jars from paint stores.

Brushes of all sizes: regular brushes for background color if there isn't one, flat brushes and tiny pointed sable brushes for detailing. Brush sets are available in craft stores.

Soft pencil for sketching. 

Stencils or letters and illustrations printed to size from a computer 

Ruler for centering and measuring 

Q-tips. These make great erasers using a small amount of soap should pencil lines show after painting. 

Wood skewers.I use the soft points on these to make adjustments to painted edges. By lightly scraping with the wooden point you can remove errant drops of paint safely from a wood surface.

How to do it

Determine where the name and illustrations will go. Measure area to find the center at top and bottom. 

Print out appropriate size letters using a font that has some weight to it. Cut the letters out with a small scissor and place the center letter in the marked center of the piece. For example, for the name Jason, the letter 's' would be the center.

Place the other letters to the right and left and lightly trace the letters being careful not to make an indent in the wood. Keep the printed letters nearby for reference as you start to paint. If this is your first time, choose simple block letters.

Most jobs need more than one coat so you'll have to go over it a few times. 

When completed, check for stray pencil lines and use a damp, lightly soaped Q-tip to erase. Dry immediately. Use the wood skewer to lightly scrape away up any small drops.

When you are happy with the lettering and/or illustrations, seal art area only with a water based gloss also available in craft stores.

    Sunday, March 27, 2011

    Anginetti: The Italian Iced Lemon Cookie; It's Easy to Find Time to Try Out Cookie Recipes For the Upcoming Easter Holiday

    Besides the probability of being a warmish day ( Easter falls on Sunday, April 24th), I think what I love most about Easter, obviously besides the religious significance, is the unhurried aura that the springtime holy day projects. With the exception of shopping for an Easter outfit (and even that practice has diminished in recent years) the fevered, frenetic-ness that surrounds Christmas gives way four months later to a more tranquil, peaceful holiday.

    At Christmas, I struggle to find the time to bake cookies. Easter? Not a problem!

    Last week I tried out Almond Macaroons. They're like a pignoli cookie without the pignolis and delicious! Earlier in March I made a ricotta cake that was similar to 'crosses', a pastry found in bakeries in our area especially around this time of the year. Today I tried a lemon glazed cookie called Anginetti or a cookie that's 'light as an angel.' These are traditionally served for dessert at an Italian Easter meal and are small and pillow-like confections with a lemon glaze topped by white or colored sprinkles. There are many recipes out there. I used the first one printed here with great results but I'm going to try another with simpler ingredients and I've listed it below. Give one or the other a try. These are easy to make and store well in covered containers.

    Italian Lemon Cookies With Icing
    Pictured above and left, makes about 3 dozen

    Ingredients:
    6 eggs
    5 cups all-purpose flour
    2 cups confectioners' sugar
    2 tablespoons baking powder plus1 1/2 teaspoon baking powder
    1 cup shortening -- melted
    1 1/2 teaspoon lemon extract


    For Glaze
    1/2 cup warm milk
    1 teaspoon lemon extract
    1 teaspoon vanilla extract
    1 box confectioners' sugar
    Colored or white sprinkles

    Directions:
    • Preheat oven to 350 degrees.
    • Using a heavy-duty electric mixer on high speed, beat eggs until light and foamy, about 5 minutes. Set aside. 
    • In another bowl, mix flour, sugar and baking powder; gradually add shortening and extracts until crumbly. Gradually add beaten eggs to form a stiff dough.
    • Roll dough into 1-inch, balls. Place on greased baking sheets and bake for 12 minutes. The tops of the cookies will not brown, the bottoms should brown slightly.
    • For glaze, combine milk and extracts in a large bowl. Add sugar and whisk until lumps are dissolved and glaze is smooth. 
    • When cookies are done, carefully drop them two or three at a time into the glaze. Remove with a slotted spoon.
    • Cool and drain cookies on wire racks and quickly shake sprinkles on top. 
    • Let dry 24 hours before storing in airtight containers.

    Italian Lemon Glazed Cookies
    This recipe calls for fewer ingredients but is untested by me

    Ingredients
    1 tsp vanilla extract
    1 tsp lemon zest
    6 tbsp butter
    ½-cup skim milk
    ½-cup regular sugar 
    3 whole eggs 
    3 -1/2 cups all-purpose flour
    2 tsp baking powder
    ½ tsp baking soda
    Icing:
    1 tsp vanilla extract
    1 tbsp fresh squeezed lemon juice
    1-cup confectioners’ sugar
    1 tbsp water

    Directions:
    • Preheat oven to 350 degrees while lining large cookie sheet with parchment paper or aluminum foil and non-stick coating.
    • In large mixing bowl, beat vanilla, zest, margarine, milk, and sugar with electric mixer on medium setting until texture is well blended. Add eggs one at a time, beating each addition, and then continue to beat mixture for 1 minute.
    • On low speed, blend flour (1 cup at a time), powder, and baking soda until consistency becomes firm, sticky dough. If needed, have wooden spoon available for mixing. Dust hands lightly with additional flour, rolling dough into bite-sized balls. Place approximately 20 onto prepared cookie sheet, spacing 2 “apart.
    • Bake 10-12 minutes, or until light golden brown.
    Icing: Combine vanilla, lemon juice, sugar, and water into a small mixing bowl, whisking ingredients until mixture is completely blended. Remove cookies from oven, placing a sheet of wax or parchment beneath wire rack. Using a small pastry brush, frost the tops of each cookie with icing, sprinkle with additional confectioners’ sugar, and transfer to rack for cooling. 

    Thursday, March 24, 2011

    When the Frost is on the Daffodils...What??

    A budding lilac bush in my yard 
    on a snowy backdrop
    Back in late fall I reprinted a well-known poem called "When The Frost is on the Punkin" by James Whitcomb Riley http://thedailysuse.blogspot.com/2010/11/when-frost-is-on-punkin_02.html as kind of a welcome to the coming winter. Well, winter...you've overstayed your welcome! One thing even a poor gardener like me does NOT want to see when they go out early in the morning in Spring is a layer of snow on the daffodils...and on the crocus.... and on the budding lilac bush!

    I wondered if the daffodils would even last until Easter this year given their frosty overcoat for the past two days and I discovered a couple of interesting facts I thought I'd share about the popular member of the Narcissus family:
    • There are over 25,000 varieties of daffodils in colors of yellow, white, orange and peach/pink shade.
    • ALL parts of the daffodil are poisonous.
    • The sap of daffodils can be damaging to other flowers. If you’ve picked them to display in a vase with other flowers, then it’s best to leave them in water on their own for at least 12 hours, before mixing them together.
    • The emblem of Wales is the daffodil. People often wear daffodils on St. David’s Day.
    • Prince Charles, from the British Royal Family, is annually given one daffodil to act as a form of rent for land on the Isles of Scilly.
    • Daffodil bulbs contain a substance called galanthine, which has medicinal properties. In fact, it’s sometimes used in treatments for Alzheimer’s.
    • Daffodils are quite tolerant of cold, especially with a covering of snow, and are grown to the Canadian border. There are a very few exceptions such as the popular Paper White. PHEW!!
    There is also a relatively famous poem about daffodils written by William Wordsworth.
    I've also included some great flower arrangements that I found online.

    "Daffodils" (1804)
    By William Wordsworth 
    (1770-1850)


    I wandere'd lonely as a cloud
    That floats on high o'er vales and hills,When all at once I saw a crowd,
    A host, of golden daffodils; Beside the lake, beneath the trees,
    Fluttering and dancing in the breeze.

    Continuous as the stars that shine
    And twinkle on the Milky Way, They stretch'd in never-ending line
    Along the margin of a bay: Ten thousand saw I at a glance,
    Tossing their heads in sprightly dance.

    The waves beside them danced; but they
    Out-did the sparkling waves in glee: A poet could not but be gay,
    In such a jocund company: I gazed -- and gazed -- but little thought
    What wealth the show to me had brought:

    For oft, when on my couch I lie
    In vacant or in pensive mood, They flash upon that inward eye
    Which is the bliss of solitude; And then my heart with pleasure fills,
    And dances with the daffodils.


    Daffodil bouquets from
    Zuzu's Petals


    The Metropolitan Museum of Art_ William Morris, Daffodils Plate, circa 1895


    A bridesmaid bouquet of daffodils

    Wednesday, March 23, 2011

    Elizabeth Tayor: An Actress Who's "Dream Came Early But Lasted The Rest of Her Life"; National Velvet: A Movie Ahead of Its Time


    Elizabeth Taylor passed away today but I'm not going to write about her life: the movies, the marriages, the illnesses or her dedication to humanitarian causes, her beauty......though they are all worthy of being mentioned. Rather, I'd like to concentrate on just one of her films, a family and personal favorite: National Velvet. 

    The movie, about a boy, a girl and a horse impressed me many years ago when I first saw it.  I thought of it as a catalyst inspiring young women to go after their dreams no matter how many challenges were thrown in the way. The movie, released in December of 1944 and the book written in 1935 by Enid Bagnold were way ahead of their time.

    Mr. and Mrs. Brown (Anne Revere), Velvet's parents.
    Elizabeth Taylor was 12 years old when she played the 'girl' in the book. The 'boy' was played by a young Mickey Rooney. She campaigned for the role of Velvet Brown in MGM's National Velvet and was an instant star when the movie was released. Her character and Mickey Rooney train her beloved horse "Pie' to win the British Grand National. Angela Lansbury, then a new British actress, played Edwina her sister and her mother, Anne Revere, was an American actress who was a direct descendant of Paul Revere. An interesting note: many of Ms. Taylor's back problems which haunted her throughout her life began when she was injured falling off a horse during the filming of the movie.

    The scene that impressed me the most and still affects me emotionally takes place in the Brown family attic where Velvet and her mother are having a conversation about entering the largest and most difficult of all horse races in England. Her mother, herself a former championship swimmer says to Velvet:

    "We're alike. I, too, believe that everyone should have a chance at a breathtaking piece of folly once in his life. I was twenty when they said a woman couldn't swim the Channel. You're twelve; you think a horse of yours can win the Grand National. Your dream has come early; but remember, Velvet, it will have to last you all the rest of your life."
    If nothing else happened in the movie that one scene would have been enough for me but of course that's not the case. The rest of National Velvet is deliciously rich in story, tone, cinematography and message - all masterful enough for the movie to garner 2 Oscar wins (one for mother Anne Revere!) and another for film editing. It was also nominated for Best Art Direction, Cinematography and Best Director.

    Another scene, not as worthy but a funny anecdote in our family was a scene when Velvet first sees the horse running at breakneck speed in some nearby fields. When my son was about 7 years old (and to the present day) he did a mean imitation of Ms. Taylor's wispy British accent in the lines recounted below where Velvet names her new horse: 

    Velvet: What's his name, Mr. Ede?
    Mr. Ede: Name? He's a murderous pirate, not deserving of a name.
    Velvet: Oh, no. not pirate. He's a gentle one. I'll just call him Pie. Oh, you're a pretty one, Pie.

    If you haven't seen National Velvet I recommend it as a great family film and a tribute to a wonderful American actress who was lost to us today. She was indeed a pretty one. 

    Tuesday, March 22, 2011

    Three Ways to be Nutty On National Goof-Off Day; Pasta, Salad and Cookies Are Seriously Easy To Make While 'Goofing Off'

    For the past week, a small can of almond paste I purchased a couple of weeks ago kept falling out of the pantry whenever I opened it. I took it as a sign: either it was begging me to use it or the pantry needed to be cleaned. Of course it was the latter but it was more fun  not to clean and use the product for the recipe I had originally intended it for: Almond Macaroons.

    Anyone familiar with my family knows that my husband is a bit nutty about nuts, his favorite being the cashew, but to be honest the rest of our family are just as guilty of loving the hard-shelled fruit in almost any form. I especially love them on a salad. I decided to make this a 'nutty' day and make a complete meal using three varieties. As I was collecting the ingredients, I wondered if there was such a thing as a National Nut Day because if there wasn't, I was about to declare one.

    Well folks, there actually is an official nut holiday and it's celebrated each year (not sure by whom??) on October 22nd. Just in case you're wondering, today (March 22) is National Goof-Off Day, tomorrow is National Chip and Dip Day and Thursday is National Chocolate Covered Raisin Day. I've attached a website from Hallmark Channel which lists all these 'important holidays' (does Hallmark make cards for the occasions??) and you might want to check the site the next time you feel the need for an excuse to take a day off.  Ahhh,.....our tax dollars at work!

    Even though the actual nut holiday wouldn't be celebrated until the fall, I was undeterred in my pursuit to make a pasta, a salad and a batch of cookies using walnuts, pecans and almonds in that order.
    The recipes are a from a variety of sources changed up a bit to suit what I actually had on hand but the changes were minimal and this meal as a whole might make a great Palm Sunday or Easter menu.

    Here's the official list of 'National' holidays. Recipes follow.
    http://www.hallmarkchannel.com/microsites/everydayisholiday/Calendar.aspx?ID=1&MID=1

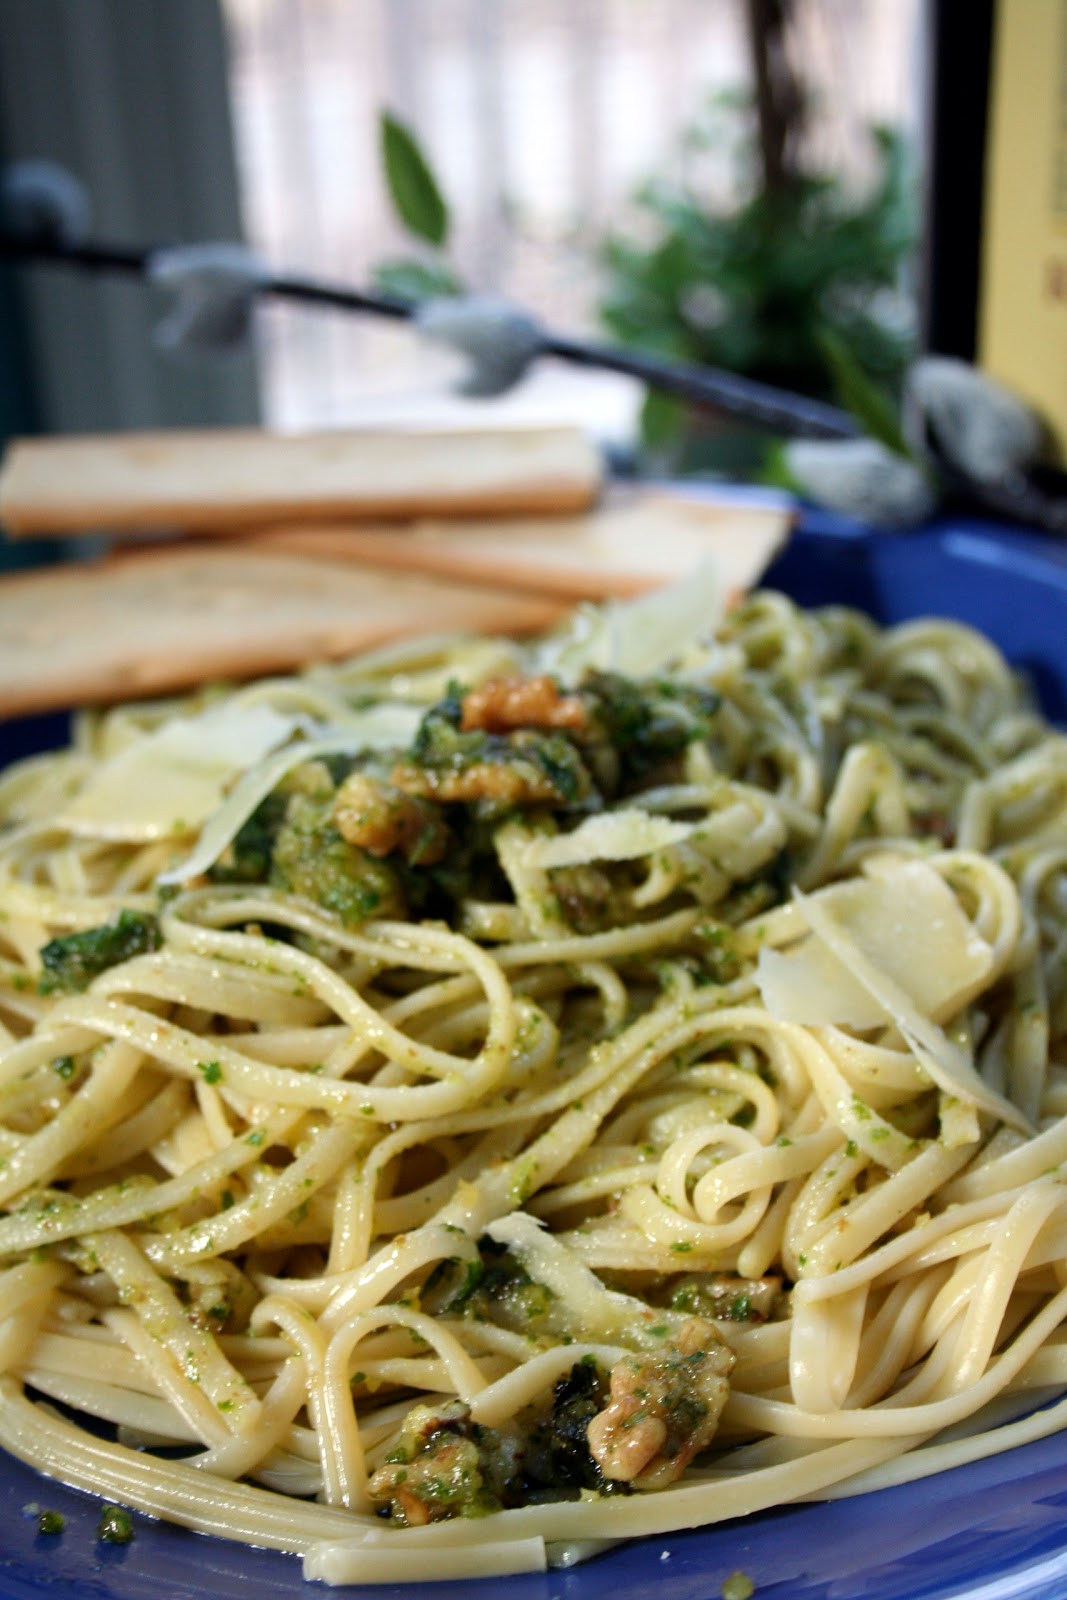
    Walnuts and Parsley Pesto Pasta
    Developed from the NY Times food columnist Mark Bittman 

    Ingredients
    1 cup shelled walnuts + 1/4 cup not added to food processor
    1/2 cup loosely packed parsley leaves, washed and dried
    1 clove garlic
    3/4 cup extra virgin olive oil
    Salt and freshly ground black pepper
    1 pound linguine or spaghetti

    Directions
    • Bring a large pot of water to a boil, add salt. 
    • Combine walnuts, parsley and garlic in a food processor and turn machine on gradually adding enough oil so that mixture forms a creamy paste. Add salt and pepper to taste.
    • Put additional 1/4 cup of olive oil in saute pan with reserved walnuts and toss until heated.
    • Cook pasta al dente, drain it and reserve a little cooking water. 
    • Add pesto sauce, walnut and olive oil mix and toss, adding more water if too thick.
    • Top with fresh Parmesan cheese.

    Glazed Pecans, Apple Slices and Goat Cheese on Baby Spinach 
    I saw this salad on NY1 Television station cooking segment here in New York. It looked so delicious and easy, I decided to give it a try. They suggested romaine lettuce, blue cheese and walnuts. I made some substitutions. 


    Ingredients:
    2 cups walnut halves (I used pecans)
    1/4 cup maple syrup
    Salt (for nuts)
    Romaine lettuce (I used baby spinach)
    Apples
    Crumbled blue cheese (I used crumbled goat cheese)
    Dressing: 1/3 cup vegetable oil, 2-3 tbs apple cider vinegar, Dijon mustard, black pepper

    Directions
    • Preheat the oven to 350 degrees and bring a pot of water to a boil for blanching the nuts. Add the 2 cups of pecan or walnut halves to the boiling water and let those boil for about a minute.
    • Use a slotted spoon to scoop them into a mixing bowl and add the maple syrup and salt to taste. Pecans or walnuts need to be well drained before adding the maple syrup.
    • Toss the nuts and maple syrup and spread out on a baking tray placing it into the preheated oven. Bake nuts for about 10 minutes stirring every now and then. Cool when done.
    • Whisk the vegetable oil and apple cider vinegar with a little dollop of Dijon mustard, black pepper and a small amount of maple syrup for the dressing.
    • Combine lettuce and sliced apples adding dressing to coat, Top with some crumbled blue cheese and 1/2 cup of toasted nuts. Reserve extra for another salad.

    Almond Macaroons
    This is from a January 2004 edition of Martha Stewart Living and the reason I purchased the almond paste in the first place. A delicious and light cookie to finish off the meal.

    Ingredients
    1 can (8 oz) almond paste
    1 cup confectioners sugar
    Pinch of salt
    2 large egg whites
    1/2 teaspoon vanilla extract
    1/2 cup sliced almonds

    Directions
    • Preheat oven to 300 degrees. Line 2 baking sheets with parchment.
    • Place almond paste, sugar and salt in a mixing bowl and beat for about 3 minutes until mixture looks crumbly.
    • Add egg whites and vanilla and beat for another 3 minutes until mix becomes creamy and thick.
    • Drop even round teaspoons onto parchment about 2 inches apart (cookies will spread slightly) placing2-3 sliced of sliced almonds on each mound.
    • Bake for 20-25 minutes or until edges are light brown, turning tray once.
    • Remove from parchment and when cool, dust with confectioners sugar.

    Monday, March 21, 2011

    Risotto: From Italy With Love (Via India and Spain); How To Succeed in Creating a Classic Entrée Without Really Trying


    Risotto is popular common entrĂ©e served in Italy and a favorite around the world. I wondered how a rice dish achieved this status in a land noted for pasta and discovered that risotto has an interesting history. In the 14th century, the Arabs brought rice to Sicily and Spain most probably by way of India.  That same century, rice made its way into the Po Valley and it's flat lands, plentiful water and humidity made perfect growing conditions. In the centuries that followed rice became a staple in that part of Italy.

    A young stained glass artisan is credited as the creator of risotto. In 1574, Valerius was put in charge of making a window for the Cathedral Duomo Di Milano. In what seems to be a case of 16th century bullying, the Milan townspeople made fun of him, implyng that the herb saffron was to be credited for the beautiful colors in his artwork. Valerius became angry and decided to retaliate by adding an excessive amount of saffron to the rice being served at his master's wedding hoping to ruin the event. Instead, everyone loved the rice, and risotto became an instant culinary favorite in Italy! 

    There are several varieties of rice used in the preparation of risotto but here in the United States arborio is the most common. Others include carnaroli, vialone nano, baldo, and Calriso. They all have several things in common: plump, medium to short grains and a high proportion of amylopectin, a type of sticky starch which produces the creamy texture of risotto. 

    The recipe I used tonight is a plain risotto made with Parmesan cheese, leeks and white wine, a very easy and inexpensive meal to prepare. As simple as it is to make, risotto is rich and satisfying: fresh bread, a salad and a glass of Italian wine is all you'll need for an enjoyable evening meal.

    Parmesan Risotto
    Ingredients
    Serves 4

    6 cups of chicken stock
    3 tablespoons olive oil
    1/2 cup minced shallots
    1 cup arborio rice (or any others mentioned if available)
    1/2 cup white wine
    6 tablespoons unsalted butter
    1/2 cup grated Parmesan cheese (also shave some extra for garnish)
    1/4 cup fresh parsley
    Salt and pepper to taste

    Directions
    • Heat stock in saucepan and keep at low temperature.
    • In large saucepan, heat olive oil and add chopped shallots cooking until translucent.
    • Add rice and cook until you hear a clicking sound about 3-4 minutes.
    • Add wine to the mixture, stirring slowly until wine is absorbed.
    • Ladle small amounts of heated stock into the rice constantly stirring until stock is absorbed. Keep adding stock in small amounts until rice is translucent. Rice should be al dente but not crunchy.
    • Remove from heat. Add butter, cheese and parsley.
    • Serve immediately.
    • Rice should be served as a mount with shaved Parmesan cheese topping the dish.
    Note: according to Martha Stewart Living where I saw this recipe the proper way to eat risotto is to flatten the outer edges of the mound to cool it slightly. Slowly eat you way into the middle so that the rice will always be at the right temperature.

    Friday, March 18, 2011

    Hanging Around The House: Festive Banners You Can Make For Any Occasion

    Remember when you had a birthday party and your mother purchased foil letters that fanned out to say " Happy Birthday"? They were also available with 'Welcome Home' or 'Good Luck' sentiments?


    Well, the party banner has come a long way from those foil letter days. Searching a favorite party website karaspartyideas.com you can find any number of styles and sizes of banners that creative party givers make. All sorts of fabrics, papers, ribbons and decorative details adorn these fluttery flags and I put it on my list of things to try.

    Teachers: this makes a great classroom undertaking.

    A couple of weeks ago I made my first banner assisted by my two young grandchildren who got into the spirit right away since a lot of gluing was involved! This banner had a purpose: a loved one was in the hospital and was due to come home after a 10-day stay. I shopped for some heavy card stock and chose a book sold in craft stores for scrapbooking aficionados. There were 48 12x12-inch sheets in the book in varying patterns of graphic black and white designs, actually more than I needed, but it wouldn't go to waste. I also purchased some stencils and colored construction paper for the letters, ribbon and of course the glue. The banner pictured on yesterday's post was a bit long. The words "Welcome Home' are quite lengthy and I would have been better cutting down the size of the paper from the original 12-inch size.


    I did another smaller flag banner using the same paper for a girl that could be used on a door or on the headboard of her bed.

    The best part about this project is that you can really do anything and it looks great. It's fun coordinating the banner to a themed party or room decor and it's a fun project to get children involved in their own party. They can trace letters, cut them out with safety scissors and glue it together. A perfect rainy day activity!

    I made another banner for a boy's christening. I used light blue dessert sized blue paper plates in squares and circles and paper doilies with the letters cut out ('expert' cutting skills are needed for this example!!). I punched two holes at the top of each plate and ran a length of measured ribbon through to string the plates together. The blank plate (used to separate the words) is perfect for a black and white photo of the baby or child. This is also nice for a communion party.

    I'm working on fabric flags for a child's play room. Will post the final result when completed.


    I've included these two photos from Kara's Party Ideas website. The checkered banners came from the 'Gingham Party' post, the other is the top post for today, a christening party.

    What You Might Need
    For paper banners, depending on the style:
    cardstock or paper plates
    contrast paper for letters
    stencils or computer generated letters
    pencil, glue, scissors, ruler
    ribbon or cording
    hole punch
    decorative stick-ons
    doilies

    Instructions
    • Measure length of area where the banner will be hung and cut triangles (all of the same size) out of cardstock to fit measures. You can back the triangles with paper as well to make it read on both sides if it will be hanging across a room. If not, decorate one side only. 
    • Trace letters from stencils or print letters on a computer and cut out using contrasting colors.
    • Glue letters to triangles on front and back. If using two sides, run ribbon in between gluing to both sides of triangles. You can space the flags apart (as on the gingham ones above) or glue them edge to edge. 
    • When dry, add decorative items or bows and let dry if needed before hanging.
    • Ribbon length should include at least a foot extra on either side for hanging purposes.
    • For paper plates: purchase plates and doilies (or other paper) that coordinate your event. Trace letters onto doily or paper and cut out, gluing to plate to create a 3D effect. Or just glue letters right onto plate.
    • Measure length of ribbon or cording to fit area as above. 
    • Punch two holes at top of each plate to run the cording through. 

    Thursday, March 17, 2011

    Happy Saint Patrick's Day To All

    No post today...


    Tomorrow: " Easy Banners to Make 
    For Room Decoration or Any Occasion" 


    Wednesday, March 16, 2011

    Four St. Patrick's Day Quizzes: Amaze and Impress Friends and Family With Your Superior Knowledge of All Things Irish

    There is no lack of misinformation about St. Patrick who is celebrated on March 17th as the Patron Saint of Ireland. But one thing is certain: he was not born in Ireland. According to legend, Patrick used the shamrock to explain the Holy Trinity to pagan Celts and the miracle of driving of snakes out of Ireland, also attributed to him, is probably not true because Ireland didn't have snakes in the first place!

    The quizzes below can answer many of your questions and separate fact from fiction. 

    For example: 
    • Do you want to know where the largest St. Patrick's Day parade is held? 
    • Or which city in the U.S. held the first parade? And when?
    • How many Americans claim Irish ancestry? 
    • Which U.S. city dyes it's river green for the holiday?


    Irish Quotes and Toasts

    May those who love us, love us.
    And for those who don't love us,
    May God turn their hearts.
    And if he can not turn their hearts,
    May he turn their ankles,
    So we may know them by their limping.

    May you live as long as you want, and never want as long as you live.

    Here's to you and yours
    And to mine and ours.
    And if mine and ours
    Ever come across to you and yours,
    I hope you and yours will do
    As much for mine and ours
    As mine and ours have done
    For you and yours!

    May the roof above us never fall in, and may we friends gathered below never fall out.

    May the road rise to meet you,
    May the wind be always at your back,
    May the sun shine warm upon your face,
    The rains fall soft upon your fields and,
    Until we meet again,
    May God hold you in the palm of His hand

    There are many good reasons for drinking,
    One has just entered my head,
    If a man doesn't drink when he's living,
    How the hell can he drink when he's dead?

    May the saddest day of your future be no worse
    Than the happiest day of your past.

    Tuesday, March 15, 2011

    I Yam So Confused! The Difference Between Two Commonly Mislabeled 'Tubers'

    Q. What’s the difference between a sweet potato and a yam? 
    A. About ten cents a pound. 

    Ba dum.

    Last year, I got into a friendly argument with a colleague at work about the difference between the sweet potato and yam. I didn't think there was a difference and I stood my ground. He disagreed, describing the yam pretty vividly. But he was a man whose wife (I'm sure) did most of their food shopping as do I, so what could he possibly know?

    It turns out I was wrong. There is a difference but one that is made more confusing by the U.S.
    Department of Agriculture which requires that the label “yam” always be accompanied with the words “sweet potato” when referring to a sweet potato. No wonder I was confused!

    The sweet potato is a yellow or orange 'tuber' (a kind of elongated root vegetable). The yellow sweet potato has a thin skin and is not sweet despite the name. When cooked, it has a texture similar to the white baked potato. The orange variety (often called "yam" in error) has a thick, dark orange-reddish skin with orange flesh. It is sweet and moist. I used this variety for my recipe.

    The yam
    A true yam is the 'tuber' of a tropical plant and is not related to the sweet potato at all. The yam is a popular vegetable in Latin American and the Caribbean with many varieties available. The yam is sweeter than than the sweet potato and can grow over seven feet in length. The skin is brown or black skin and off-white, purple or red flesh, depending on the variety. 

    Now that that's settled, I came across a recipe last week that I made on Sunday. The recipe called for a whole sweet potato topped with caramelized onions and parmigiano-reggiano This is almost to easy too post but it's such a nutritious side dish loaded with beta-carotene, an antitoxident that helps prevent heart disease and cancer. I changed up the recipe not being a huge fan of onions  and served mine with sauteed spinach (even more carotene!) and of course the tasty Italian cheese. 

    Tonight, I sliced the leftover sweet potato and added it to my salad. Did I call this a side dish? It could really be a main course! 

    Baked Sweet Potatoes With 
    Caramelized Onions and 
    Shaved Parmigiano-Reggiano

    Ingredients
    6 medium sweet potatoes
    1 tablespoon unsalted butter
    4 large yellow onions cut in half, then sliced into 1/2 inch thick half-moons
    (OR substitute 3 cups of fresh spinach, steamed with 2 tablespoons olive oil added when cooked)
    3 tablespoons sugar
    I teaspoon kosher salt
    1/4 teaspoon pepper
    2 tablespoons balsamic vinegar
    1/2 cup freshly shaved parmigiano-reggiano cheese

    Directions
    • Preheat oven to 450 degrees
    • Place potatoes on a baking sheet for 45 minutes.
    • For caramelized onions:  Melt butter in non-stick fry pan over medium heat. Add onions and cook until soft. Add sugar, salt and pepper. Cook on low heat for about an hour until they become caramelized adding small amounts of water if needed. Add vinegar and stir.
    • For spinach: Steam spinach leaves until tender. Drain and dry as much as possible. Place spinach in saute pan and olive oil. Salt and pepper to taste.
    • When potatoes are done, split open and top with onions or spinach and cheese.
    The sweet potato